
Last Updated on May 15, 2025 by Laura
The moment is arrived. I can believe that after months (better years) of detailed planning for my trip to Japan, I finally booked by last shinkansen train yesterday morning. I feel relieved and still pinching me this trip is happening for real given that I’ve had to cancel it already two times in the past 6 years. On a positive note, these years spent in planning a trip that didn’t happen, gave me a knowledge of Japan train system that most people don’t have when it comes to plan their trip. Therefore, I hope to use what I learnt in this bumpy process to help you planning your own trip to Japan. This blog, in particular, will be your step by step Shinkansen train booking guide for Japan 2025.
I am planning to write extensively about my trip to Japan (which finger crossed will be next month). So, if you are interested in other topics, (or other type of trains), stay tuned for more guides once I return for my trip!
What is a Shinkansen
I would like to start this blog with the basics. Indeed, as soon as you start planning a trip to Japan, the word shinkansen will pop out in your research. Whether you are familiar or not with the term, it’s good to know some basic facts about it!
新幹線 aka Shinkansen, or for English speakers, “bullet train / dangan ressha” is a word that describes both the rail network and a specific type of Japanese train. Indeed, the term shinkansen literally means ‘new main line’ but it refers to the entire HRS (High-speed railway) in Japan ( e.g. a part of this network is the Tōkaidō Shinkansen). Nowadays, the term is also used to indicate the singular train (e.g. Nozomi Shinkansen), to distinguish them from regular (slow(er) speed) trains.
The original shinkansen project dates back to pre WWII. Nevertheless, the first train on the Tōkaidō Shinkansen started its service only on 1st October 1964 cutting the travel time between Tokyo and Osaka from 6 hours and 40 mins to about 4 hours. Today, the shinkansen lines reach the speed of 320 km/h and it is expected to hit the speed of 500 km/h by 2034.
Shinkansen lines
There are 8 operating shinkansen lines in Japan with other additional two expecting to be in fully in service in 2034 and 2038 ( Hokkaido and Chūō Shinkansen). These currently operating lines are the following:
- Tōkaidō Shinkansen connecting Tokyo to Osaka
- San’yō Shinkansen connecting Osaka to Hakata
- Tōhoku Shinkansen connecting Tokyo to Aomori
- Jōetsu Shinkansen connecting Ōmiya, Tokyo and Niigata
- Hokuriku Shinkansen connecting Takasaki, Tsuruga and Tokyo
- Kyushu Shinkansen connecting Hakata to Kagoshima-Chūō
- Nishi Kyushu Shinkansen connecting Takeo-Onsen to Nagasaki
- Hokkaido Shinkansen connecting Shin-Aomori to Shin-Hakodate-Hokuto
Two further lines known as “mini shinkansen” are the Yamagata Shinkansen and the Akita Shinkansen. If you are a first timer visitor to Japan, it’s very likely you will only use the Tōkaidō and San’yō Shinkansen lines. Indeed, these are the ones connecting the major cities of Tokyo, Kyoto, Osaka and Hiroshima. The entire shinkansen network is owned by JR (Japan Railways) Group.
Type of Shinkansen Trains
Something that many visitors don’t know is that shinkansen is not just one train. Indeed, as discussed before, the term refers to the whole network but applies also to single trains. This means that under the name shinkansen there are actually many types of trains. So, what is the best train for you? This paragraph will offer essential knowledge for your planning because, by knowing what train you’ll need for your itinerary you will save some time and maybe some money.
When the time to book your train will come, you’ll see that next to the departure information (time, date), each train will display a name. This name is not just a nice way to call the train, but it’s an essential information that suggest visitors the category of vehicle they are travelling based on the speed this will reach. Knowing this information will determine how quick you can get to your destination.
Shinkansen train categories
There are mainly five categories of shinkansen you will find as first time visitor.
- Nozomi. This is the fastest service on the Tōkaidō and San’yō lines. It has fewer stops and an optimal connection between big cities. Reach 300 km/h
- Hikari. Second fastest service on the Tōkaidō and San’yō lines that can be used with the JR pass (more on this later). It has more stops than Nozomi. Therefore, it takes more time to reach certain destinations.
- Kodama. This train stops at all the shinkansen stations on the Tōkaidō and San’yō lines. This is the slowest train on the network but good if planning to visit intermediate spots between big cities.
- Mizuho. This train travel on the San’yō line, specifically between Shin-Osaka and Kyushu. The average travel time between these destinations is 3h and 45 mins. It’s on average 25 mins faster than Sakura.
- Sakura. This is a semi-express train that travels between Osaka and Kagoshima-Chūō. It operates once every hour and it’s the fastest service on the San’yō and Kyushu Shinkansen lines that can be used with the JR pass.
Things to know before booking a Shinkansen
In this paragraph I will discuss some topics that are very useful to travellers when it comes to book shinkansen trains, for example their compatibility with the JR pass and other things that are important to know before booking.
Shinkansen classes and seats

 Shinkansen train booking guide – Ordinary Car (blue) vs Green Car on Nozomi.
Before booking your shinkansen, is better to know in advance which category of classes you can find on the train. There are 3 main classes on shinkansen trains: ordinary, green and grand class.
- Ordinary class. As the name suggest is the “economy” seating class of the train. Nevertheless, this is still very spacious and with comfortable seats. Rows come in 2 and 3 seats. Definitely much better than the trains we have in Europe!
- Green Class. A much larger cabin with rows of two seats with more comfortable seatings and space. Prices are 30 to 40% more than ordinary class usually.
- Gran Class. This class is available only on Tohoku Shinkansen, Hokuriku Shinkansen, Joetsu Shinkansen and Hokkaido Shinkansen. It’s a very luxurious class with even more comfortable seats and some inclusive perks (i.e. free snacks/drinks)
Fares changes according to the class of booking and the fact that you can have a “reserved seat ticket” or “non reserved seat ticket”. As the name suggest, the reserved seat ticket will guarantee you a seat on the train, no matter how busy it is. If you book a “non reserved seat ticket”, this comes at a cheaper price. Nevertheless, doesn’t give you a guaranteed space on the train. You’ll need to queue for a space and in busy periods, you might not find a space in the desired train. Therefore, unless you don’t have any rush or travel low season, I would recommend to pre-book your seat to avoid any disappointment.
Shinkansen trains and (JR) Japan Rail Pass
One of the perks of the JR pass is that allows you to book the shinkansen trains as part of the package. Fantastic right? However, there is a trick. Indeed, only the “slower” shinkansen are included in that package. If you want to book faster trains like the Nozomi and Mizuho, you’ll need to pay a surcharge.
Is the JR pass right for my trip?


 Shinkansen train booking guide – Seating information and photos from the station
When I first started planning my derailed trip to Japan in 2018, I would have said 100% yes. Indeed, price of the JR pass was very convenient and on a 20+ days trip it definitely helped to save some bucks. In 2025, I’m no longer sure this is the case. Indeed, prices of the JR Pass have spiked quite substantially. A 7-day pass for a green class is now 70,000 YEN – £363/$469 and for a regular class is 50,000 YEN – £260/$335. On top of this, the pass can’t be used on the fastest services unless paying some additional $$$. Therefore, to me was a big NO.
However, the JR pass can still be valuable if:
- You are planning to travel extensively across Japan using multiple JR lines
- You don’t need to save time for your trip and can afford to stay on the train for an extra hour (e.g. if you have many days and doing slow(er) travelling)
- If you are planning to spend on trains more than what you will pay with the JR pass
On the other hand, the JR pass might not be valuable to you if:
- Have limited time in Japan and will use only a few JR lines
- Planning to use also other companies trains (e.g. Odakyu lines)
- Want to travel on the fastest shinkansen lines
If you are still unsure if a JR pass is for you, I do recommend using a JR pass calculator to see if you would save any money by buying a pass. The official one on the JR page will help you figure it out.
Why I didn’t use a JR Pass for my trip
I thought a lot if a JR pass was worth for my trip in 2025. I planned the itinerary, used the calculator and after a thoughtful reflection the reply was not. Here is a breakdown of why I didn’t a JR pass for my trip that might be applicable to you if doing a similar voyage.
My trip to Japan will be two weeks. This means I would have need to buy a 14-day JR pass (regular car) at the cost of 80,000 YEN equalling to $536/£ 415 per person. Therefore, the expense between me and my husband would have ranged round $1000/£830. Only for the trains. Not even green class!
According to my itinerary, I need only 4 shinkansen, 1 JR Limited express train and 2 other trains belonging to different train companies. Believe me or not, I managed to get all of this (including the extra trains not belonging to JR, with less than £800/1000 for both me and my husband. On top of this, 3 out of 4 shinkansen are on green cars!
Here is a breakdown of the cost:
- Nozomi Shinkansen from Tokyo to Kyoto £149,61 – Green Car
- Nozomi Shinkansen from Kyoto to Hiroshima £120,67 – Regular car + Extra luggage space
- Nozomi Shinkansen from Hiroshima to Osaka £148,59 – Green Class + Extra luggage space
- Nozomi Shinkansen from Osaka to Kyoto £166,13 – Green Class + Extra luggage space
- JR Limited Express FUJI EXCURSION A/R £96,13 – Booked via Klook here – Use HISTORIAN25 for a 10% off.
For all the JR services we paid £681,13 (£340.56 per person!). That’s a pretty good deal! Want to know how I did? Continue to read.
How long in advance do I need to book shinkansen trains?
Over the years, I’ve seen many youtubers and read a few blogs saying that“it doesn’t matter how long in advance you book your train, you will always find space because they are very frequent”. Mmmm let me dissent a minute. Yes, it’s true that shinkansen trains are very frequent, so if you miss a train there will be probably another one 15 mins after. NEVERTHELESS, if you want to same some cash, when you book your train it really matters.
Indeed, not many people know that if you book shinkansen trains 28+ days before your departure dates, you can save up to 20% compared to the regular fare (SmartEX/SmartEX non-reserved seats). Moreover, the JR website, has also some special discounts applied if you booked 2 trips, or if one uses specific “fare discount classes” called Hayatoku. Let me explain this in more detail.
Hayatoku discount for shinkansen
 Shinkansen train booking guide – Overview of the routes where “discount” logo is applied
As said before, Hayatoku is a specific fare discount that is applied to shinkansen fares when booked more than 28 days before the trip and up to 3 days before the trip (on certain trains/lines). Originally there were 9 types of different Hayatoku. However, from 1st April 2025, there will be a revision of these discounts and only 4 types of Hayatoku will be available. Launch of these new discounts will be from 7 April 2025 for reservations starting on 7th May 2025.
Please note that Hayatoku discounts will be available on SmartEX a month before your travelling date. E.g. if you are travelling on 20 March, these will appear on 20th February.
Types of discount
 Shinkansen train booking guide – Overview of the discounts available for a route Tokyo-Kyoto.
- EX Family Hayatoku 7. This discount will be available when reserving 2 or more people at the same time on Tokaido Shinkansen only. Available throughout the year but not on busy periods (i.e. Golden Week). Reservations can be changed/refunded.
- EX Hayatoku 7. This discount will allow guests to save on reserved seats on “Nozomi”, “Hikari”, “Kodama”, “Mizuho”, “Sakura”, and “Tsubame” trains when making a reservation at least 7 days (23:30) before the boarding date. Discount available only for Tokaido, Sanyo, and Kyushu Shinkansen lines. Reservations can be changed/refunded.
- EX Hayatoku 21. This discount will allow guests to save on reserved seats in a regular “Nozomi” train by making a reservation at least 21 days (23:30) before the boarding date. Tickets can’t be changed/refunded after reservation.
- EX Hayatoku 3.This discount will allow guests to save on Green Car of “Nozomi”, “Hikari”, “Kodama”, “Mizuho”, “Sakura”, and “Tsubame” by making a reservation up to 3 days (23:30) before the boarding date. Can be changed/refunded only if certain conditions are met.
Please note the Hayatoku discounts are available only in certain trains and lines and they route is clearly marked with the word “discount” – See photo above.
Travelling with extra luggage
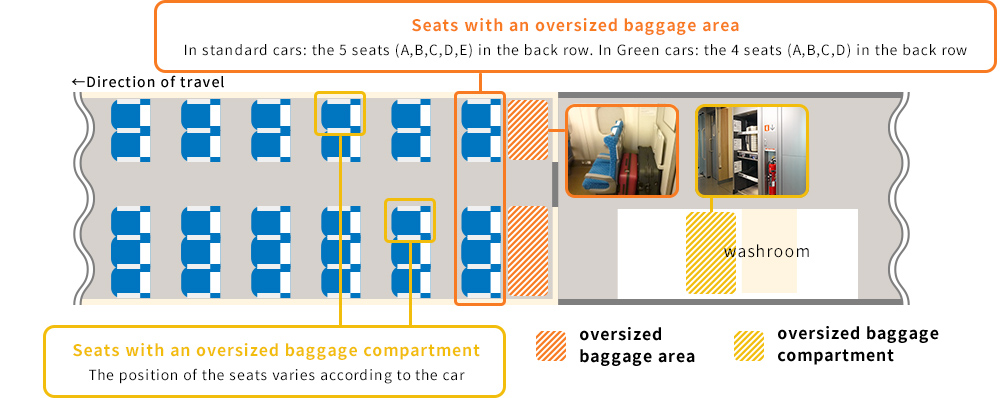
 Shinkansen train booking guide – Seats with oversized area/compartment (photo credits: Global JR website)
Luggage are a very hot topic when it comes to travelling in Japan. Indeed, travelling with many bulky luggage does not sit well with Japanese culture. Big luggage, especially when carried around the busy Japanese public transport, are a nuisance to other people. Indeed, they occupy spaces that can be taken by humans. Thats why many Japanese people use the Ta-q-bin service. This service, literally ship luggage (and other items) from one location to another, allowing people to travel luggage-free.
A strict luggage ruling system is applied also to shinkansen travel. In fact, travellers who have luggage measuring between 160 and 250 cm can’t take these onboard unless reserving the dedicated “Seats with an Oversized Baggage Area”. People who take bulky luggage without reservation will incur on a 1,000 YEN fee per luggage and a probable public shaming since your luggage will be removed and taken near an exit door.
Therefore, if you know you will have a oversized luggage, is better to book those specific seats. They don’t cost more (unless you book via Klook). Extra luggage space are usually at the end of each carriage, near the exit (see picture above).
If you want to travel luggage free, I do recommend using a Ta-q-bin service such as Yamato. For small transfers (e.g. from hotel to hotel in the same city or from airport to hotel), Klook works with Airporter at very convenient prices. You can book your luggage transfer here for Tokyo and here for Kyoto/Osaka (you can use HISTORIAN25 for a discount!)
Shinkansen train booking guide 2025
Now that I explained some essential information on shinkansen travel, it’s time to guide you step by step on how to book your tickets. I will explain two different processes you can potentially use. The one via the official JR website (SmartEX), and the one via Klook. For both processes there are pro and cons. Indeed, while on JR you might save some money because you can use the Hayatoku discount, Klook is more user-friendly and very straightforward to use. The difference in price is not huge (about £20/$25). However, the sum piles up if you need to book multiple tickets. So, it’s up to you deciding what platform is more convenient for your needs. I’ll dig more into this in each option in the following paragraphs.
Shinkansen train booking guide. Booking the shinkansen tickets via SmartEX JR
The official website were to book your shinkansen tickets is called SmartEX. If you live in the United States, Canada, Australia, Singapore, Hong Kong, Malaysia or Thailand you can use SmartEX also on your phone via the SmartEX app (Android or IOS). Those who live in Europe, (like me), and other countries not mentioned above, must book their tickets through the main website. Here, I will guide you through the website process (the one I did), assuming this will be very similar also on the app.
The SmartEX system, might seem a little confusing at the beginning because of the many steps needed to set up your profile. However, once you have set up your account, booking tickets is actually very easy. So, let’s start from the lengthy part.
Step 1 – Register with SmartEX
 Shinkansen train booking guide – Smartex interface
In order to book shinkansen tickets online, all the people who want to use this service MUST register for a membership with smartEX. This is free, but compulsory to proceed with your reservation. Therefore once you enter in the SmartEX homepage, just click “Register” next to the Login button. From here you will be taken to the screen below.

Please note that a valid credit card is requested to finalise your registration. You won’t be charged during the registration stage, but this will be stored on the SmartEX system for the moment you will be paying for a train ticket. Once you click the registration button, the system will ask you the following:
- To insert an email you use regularly
- It will send you a confirmation email with a link to check either from your mobile or pc
- It will ask you to agree to the “membership agreement and privacy policy”. Here please click OK AGREE at the bottom.


After all these steps, you can start the “real” registration. Indeed, the system will take you to the “membership registration” page where you must insert your name, date of birth, credit card, create a password and insert your SUICA card number (if you have one, more on this later). Once you have inserted all the details, click “confirm”. You will now receive an important email that include your membership number. Please make sure you save this number somewhere that is easy to access as this will be required every time you will access the SmartEX website.
2 – Buying your first shinkansen ticket on the SmartEX website

Now that you have a membership account active, it’s time to use it for your first shinkansen booking! As a first thing to do, go back to the home page. This time you will use the login button. As I said before, keep your membership number handy as you will need this every time you have to login. I personally saved it on my phone notes, to avoid searching for this on the email every time. Once you have logged in, you will see the below colourful screen. This has many sections. let me explain them one by one.
 Shinkansen train booking guide – SmartEx booking interface
- Search Train section is for purchasing your tickets with all the extras (e.g. extra luggage, specific seats etc.)
- Purchase Non-reserved seat, is a quick way to purchase a ticket for a non reserved seat car (you have this option also on “search train”).
- Setup Reservation Preference, allows you to choose your favourite stations and save them on the system. Very good if you travel often between the same stations.
- Setup Quick Login. Does what the name says, allows you to create a short login mode for access the website. I have to say this login method doesn’t work half of the time, so I won’t bother it.
- Change password. Is quite obvious.
- Change/Cancel Membership info, allows you to modify your details, and allocate your Suica card.
- My Trips, allows you to access your reservations (including QR codes).
For the moment, the only section you’ll need to use is Search Train.
Search and book a shinkansen train on SmartEX

Once you click on “search train” you will get to the screen above. Here, you can customise your journey according to your preferences/itinerary. The first thing to do is, of course, picking up a date, time and destination.

 Shinkansen train booking guide – Selecting tickets on Smartex
Then you will need to choose your “seat type”. When you click the drop down menu a series of options will show. For example, oversize baggage area, work seat etc. If you don’t need a special seat type, just don’t select any of the options.
To note. Passengers are allowed to choose their seats only if they book 1 month before their travel date. You can still chose a designated seat but the allocation will be automatic one month before. Once you have made your selection, click “continue” at the bottom of the page.


The next screen you will see is the list of trains available from the time you specified. As I discussed before, you will see different names for that route e.g. Nozomi, Hikari etc. If you look at the arrival/departure times you can immediately spot the slower trains. If a train has a discount available, the discount logo will be displayed near the “select” button. Once you select your train, you will be taken to the fare selection screen. Here, you can choose if you want to travel in the ordinary car or green car. If any Hayatoku discount is available, it will be displayed on this page.
For example, for the picture above an Hayatoku 3 Green Wide discount was available and the green class could be booked at least 7,000 YEN less than regular price. To note these discounts will change from May and that certain tickets are not refundable.
Seat Selection
 Shinkansen train booking guide – Selecting the car type on SmarEx
If you are booking from one month before your trip, under the fare, you will see also the “view seat map” button. If you click this, a map of the train with the available seats will appear and you will be allowed to choose your preferred spaces. To note that Fuji side seats are usually on the D side.
 Shinkansen train booking guide -Selecting the seat on shinkansen
If you are booking more than one month before, the option of choosing your seat is not open and this will be allocated to you automatically one month before your trip.
3 – Add an oversize luggage to your shinkansen booking
If you are travelling to Japan from oversea, it’s very likely that you will have one or more big luggage with you. Therefore, unless you will opt for a Ta-q-bin service, you’ll need to bring them aboard the shinkansen for moving from a place to another. The reservation of your seat + luggage space start again from the main search place. Indeed, when selecting the date/time and destination of your trip, you’ll must select also “Seats with Oversized Baggage Area” under from the designation drop down menu. Once you have done this step, you’ll have once again select your fare: ordinary vs green class.
TO NOTE: adding a luggage won’t increase your fare price. Tried and Tested by me several times.
Now that you have selected your fare, you can choose the seats from the map. For convenience, the SmartEX website, will show you only the seats that have a luggage space allocated. These are usually the ending seats of each car. These spaces, have an allocated back space where to store the luggage. Don’t use this space unless you have a reservation for those seats or you will incur on a 1000 YEN fine for each luggage.
4 – Paying for your shinkansen tickets
Either if you have a regular seat or one with additional luggage space, once you have selected your seat, if you click OK, the booking system will automatically charge your card (the one used for registration) and create a reservation for you. This will show up on the section called “My Trips”. Make sure you have enough funding on your designed card when paying for your tickets.
5 – Handling your tickets
I would like to underline that all tickets booked via SmarEX are digital tickets. These work mainly in two ways: or via QR code display or associated with a Suica card.
Access QR Code on SmartEX
To access your QR code, follow this sequence:
My Trips> Details (from your reservation booking) > Display QR Ticket (if there is more than 1 person, you have to then click again on the specific person Display QR Ticket)
To note that some QR code readers might not work properly, therefore JR suggests to print out your code for a possible backup solution. You can do this via the “Print QR Code” section on the QR code page.
Link your Shinkansen Tickets to your Suica
A possible better option is allocating your tickets to your Suica card. In this way, when touching the screen at the JR gate, you won’t need a QR code, but the physical card (or the one on your phone). To link your Suica to your SmarEX account, you’ll have to go back to “My Tickets”. Click the details of your reservation and here, instead of Display QR Ticket, you’ll have to click “Designate IC Card”. You can register up to 7 IC cards (if I am not wrong) and allocate each ticket of your booking to a card. If you haven’t allocated any card yet, you can register your card with the specific button.
For example, I registered both mine and my husband Suica on the system and allocated each of us one ticket.
TO NOTE: for those like me who have a digital Suica on iphone, you can discover your Suica number only if you have a Suica app as well and click “info” on the associated card.
When scanning your suica card at the gate, don’t forget to pick up your seating information card that will pop up from the other side of the gate! This might be asked onboard by member of the staff.
Collecting Tickets at the station
If you don’t want to use a QR code/Suica but want a physical ticket, you’ll need to collect this at the specific JR collection ticket machine at the station. Please be aware that the code you see under the QR code, IS NOT the collection code for the ticket. In fact, if you want to collect your tickets, you’ll need to ask SmarEX to issue you a “pickup code”. You can do this via My Trips > Issue Pick up code. The machine, will ask you this code to release your ticket(s).
Shinkansen train booking guide. Booking your shinkansen tickets via Klook
 Shinkansen train booking guide – Klook interface for booking Shinkansen tickets
A second, and perhaps more efficient, way of booking shinkansen tickets is Klook. If you never heard about Klook before, you are missing out. Indeed, Klook is a platform that allows you to book hotel, travel arrangements and experiences all from one place and most of the time with some good discounts. I discovered Klook when I started planning my trip to South Korea last year and since then I never stopped using it! Also for my trip to Japan, I scouted a few hotels on Klook that were about 30% less than Booking.com!
Klook is the only other platform (in addition to SmartEX) where you can book shinkansen tickets. There are both pro and cons in using this platform for your trip and I will be very honest regarding this, so you can make an informed choice.
Pro of using Klook
A huge pro is that the platform is super user friendly. No weird ways of register yourself, no credit card asked in advance. You see directly what you book with no frill or possible misunderstandings. Moreover, you can pre-book your tickets largely in advance as you just need to tell the platform your preferred date and time, and when is the moment, Klook will do all the job for you and send you the ticket directly in your inbox. I’ve personally tried this service for the impossible-to-get train tickets for Mt. Fuji and worked brilliantly.
Another perk, is that you can also add easily the “extra” to your ticket like the extra luggage space or even a seat on the Mt. Fuji side! Tickets will be released with the ready-to-use QR code and you are perfect to go!
I see a lot of advantages in using the Klook app for those who don’t want to loose time with the complicated Japanese SmartEx system or simply have every booking (hotels, attractions and transport) all in one place.
Cons of using Klook for shinkansen
Being VERY user friendly, unfortunately comes with an extra cost. This is the case for Klook.
Hidden costs
Indeed, while the JR website doesn’t charge you extra for all the little supplements like your seats or your luggage, Klook decided they will take advantage of their friendliness to charge users more for these services. Indeed, adding a luggage on the train can add $7 to your booking and choosing a Mt. Fuji side space can add $3 or $4 to your reservation. Moreover, for each booking, Klook charges a reservation fee (thing that JR doesn’t). I’m also not 100% sure but I had the suspect that ticket fares were also about 20% more than the JR website as the price didn’t match exactly what I saw on JR.
Therefore, if you have to book multiple trips and have luggage, learning how to use the JR website might help you saving some cash, which we all know it’s great when it comes to plan a sometimes expensive trip like Japan. I can confirm that in my case, we saved around £200 ($266) by booking with JR compared to Klook. Of course, the friendliness of the website is a big pro and if you don’t mind paying a little extra is definitely worth. We decided to use Klook only for the Mt Fuji trip, which was really worth the extra fee since those are very difficult to get tickets.
No Suica matching
Another con is that with Klook you can’t associate your shinkansen tickets to your Suica. This means that you must find the QR gate to enter the shinkansen departure area, while with the ticket loaded into the suica you can enter any shinkansen gate at the station. This was a huge point for us, particularly at Tokyo station that is very difficult to navigate. Being able to use the suica to access saved us a lot time and hassles.
Just to note that I am a Klook affiliate and really love their website but in this case it’s fair to explain how this can affect someone’s budget when it comes to booking train tickets.
How to book shinkansen tickets with Klook
 Shinkansen train booking guide – Selecting train types and times on klook
Booking shinkansen tickets with Klook is very easy because of the straightforward interface. Indeed, all you need to do is insert your departure point, destination and date and click “search”. You will then see the interface above with a lot of times and prices. On the left, you can filter the departure time according to a more restrictive time frame. Once you have found your desired time, click on the orange arrow down and you will be allowed to choose the type of car and seat for your trip.


Once you have chosen a type of car, the system will allow you to personalise further your trip by choosing what specific type of seat you wish (e.g. Mt Fuji Side, Aisle etc). Moreover, at this stage you will be allowed also to choose a seat with an extra luggage space. After you have personalised your trip, you’ll need just to add your details and pay for your ticket. If you have a discount, that’s the section of the booking where you can use it to save some money! You can use my code HISTORIAN25 to have a discount on your ticket.
Congratulations! You have booked your first shinkansen ticket! Similarly to JR, also Klook will send you a QR code that you will need to scan at the JR gates. No need to collect paper tickets (unless the QR gate isn’t working).
And that’s it! In a way or another you managed to get your shinkansen tickets! Now I’ll leave you to the fun part of navigate the crazy Japanese stations!
No time to read? Pin it for later!


Like this:
Like Loading…
Please visit:
Our Sponsor